

If you’re part of a business, an educational organisation or you simply want to consider how you can communicate better with colleagues and clients who may be visually impaired, it’s good practice to start making your text documents accessible.
Here, we will arm you with some new strategies you can use immediately to start creating more accessible written documents.
It’s easy to apply a few new practices when you’re creating documents, so they are accessible to most people and to people who use a screen reader in particular. Essentially, your goal is to create content that works for - and is useable by - everyone from the start. This is much easier than trying to fix it later.
So, whether you’re using word processing applications - such as MS Word in Windows, Pages on a Mac or cloud-based formats like Google Docs - apply these guidelines and you’ll be aligned with Universal Design for Learning (UDL) principles.
6 ways you can make text-based documents more accessible to readers who are blind or visually impaired
1. Save As .docx
If you don’t have a conversion tool, ensure you save a copy of your documents as a .docx file.
.docx allows you to keep the formatting you’ve written into the document – headers, paragraph fonts, quotes etc. This is an improvement on saving as a .txt file – which although accessible, won’t hold the formatting you put in the document.
Assistive technology programs navigate a .docx document better and using .docx makes documents accessible to more types of assistive technology. It also makes it accessible to people using different word processing applications. For example: if you’re working in MS Word and you save a file as a .docx, it can be opened by Windows, Mac and Google devices.
How to save as .docx
Microsoft Word documents automatically save as a .docx so you can just click Save. Alternatively, click Save As when you complete a new document and choose .docx from in the drop down. This means your document is accessible to more users.

Please note: You cannot Save or Save As in Google Docs because it automatically saves in the cloud. When you download that file, you can select the format you want to download or share, and .docx is one of those options.
2. Apply Formatting
The more you use the formatting features in your word processing application, the better your accessible document will be.
In Word, you find these formatting and style features under the Home tab of your toolbar. In Google they are in the default toolbar at the top of your document and in Mac you will find them under the formatting button in the upper right-hand corner of your document.
Headings
When you apply a ‘Heading Style’ to your text instead of just making the font bigger and bold, it creates a tag in the code that talks to accessibility software and lets the user of AT know that there’s a hierarchy. That tag also helps accessibility software navigate by sections.
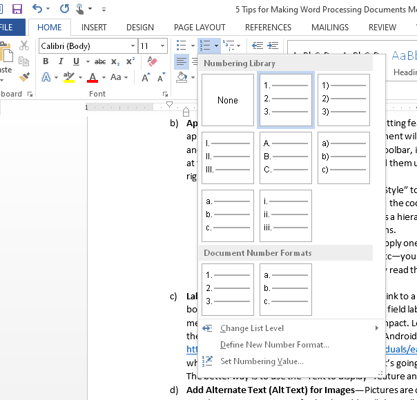
Lists
When you list things and apply one of the many list options available - numbered, bulleted, outline, chapter, etc - you create a tag in the code. This helps accessibility software read the list appropriately and navigate the list easily.
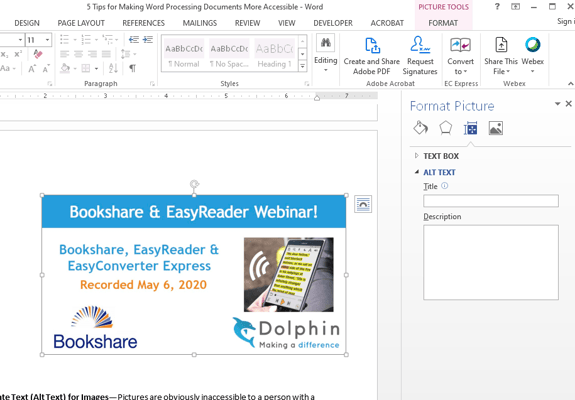
3. Add Alternate Text (Alt Text) for Images
Pictures are often inaccessible to a person with a visual impairment. You can fix this by adding Alt Text to all images in your documents. In all the aforementioned word processors, simply click the image to select it and then right-click on the image to choose Format Picture/Layout and Properties to get to the Alt Text feature.
Once you’re there, you can add a title to your image and a description of that image. Doing this creates a tag in the code that makes the image content plain to all readers of your document.
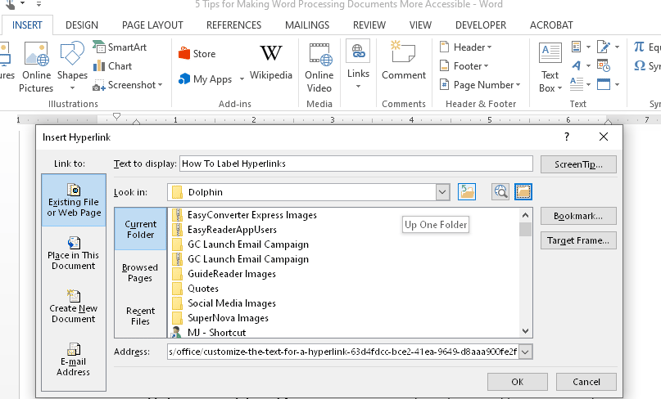
4. Label Hyperlinks
When you insert a hyperlink to a piece of text, you will see a field labelled ‘Text To Display’ at the top of the dialogue box. Adding a meaningful word or phrase in this box will have a big impact on accessibility.
Usually, if a person using a screen reader hovers over a link, their screen reader will read all the link’s characters. Using the ‘Text to Display’ feature means you can type in a simple description for that link, so it’s easier for the reader to understand
5. Use Tables Wisely
We recommend that you try to avoid using tables in any document you would like to make accessible. Tables can be a huge barrier for the majority of assistive technology tools and even the best tool struggles to read a table properly. We advise that you use them sparingly – or not at all – if you’re trying to make a totally accessible document for use by a person who is blind or visually impaired.
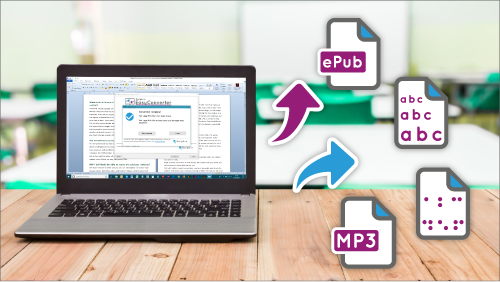
6. Use Conversion Tools for Truly Accessible Documents
While the previous five tips help make your word processing documents more accessible, these documents are not considered ‘accessible file formats’ and some assistive technology tools still don’t handle word processing documents very well. This is especially true of screen readers. It is always better to try and use a true conversion tool – such as Dolphin EasyConverter Express - that creates accessible formats like DAISY, ePUB, Mp3, large print and Braille.
The good news is that the work you do in making your word processing documents more accessible by applying the five practices above will pay off when you convert those files to an accessible format. Each of your documents following the best practices outlined above will have headers, lists, labelled hyperlinks and Alt Text, so they’ll already be tagged and navigable.

About Dolphin EasyConverter Express
EasyConverter Express is an easy to use, low-cost conversion tool available now in the Microsoft Store. A simple Microsoft Word add-on, EasyConverter Express enables you to convert and save any Word document to Braille, Large Print, Mp3 or ePub, at the click of a button.
Use EasyConverter Express to make new documents accessible, and to convert older documents into accessible formats. With EasyConverter Express, you can quickly and easily save your documents in multiple formats. This means you can immediately offer a range of accessible documents to people with visual impairments.
You can get EasyConverter Express in the Microsoft Store and multi-user pricing is available for schools.
Let Us Know What You Thought about this Post.
Write your comment below.